
Knowing how to animate a logo isn't just a technical skill—it's about breathing life into a brand. It involves prepping a vector file, firing up software like Adobe After Effects, and then using core techniques like keyframing and easing to tell a story. You're turning a static image into a dynamic asset that genuinely grabs attention and sticks in people's minds.
Why an Animated Logo Is a Game Changer for Your Brand
Before we get into the nuts and bolts, let's talk about why this is worth your time. In a digital world overflowing with content, a static logo is easy to scroll past. It just sits there. An animated logo, on the other hand, does some serious heavy lifting.
Motion can tell a story in a split second. It telegraphs your brand’s personality—are you playful, sleek, innovative?—in a way a still image just can't. That immediate connection makes your brand feel more current and professional, turning a passive glance into real engagement.
The Strategic Value of Motion
Putting your logo in motion is a smart strategic move. It’s a huge step up from a static image and plays a major role in your efforts to how to create a memorable brand identity. This isn't just about adding some fancy flair; it’s a tool that can deliver real results.
Think about how it works across different channels:
- Video Content: A slick animated intro or outro makes your videos instantly recognizable and gives them a polished, high-production feel right from the start.
- Social Media: We all know motion stops the scroll. An animated logo in a social post or story can seriously boost engagement and get more shares.
- Website Experience: Whether it’s a loading icon or a subtle hover effect, it makes the user experience feel more dynamic and keeps your brand top-of-mind.
Here's the bottom line: The real power of an animated logo is its ability to boost brand recall. Our brains are hardwired to notice movement, making an animated logo far more memorable than its static counterpart.
A Growing Market for Animation
This shift toward dynamic branding isn't just a passing trend; it's a massive market movement. The global animation market is on track to hit around $400 billion by the end of 2025, all thanks to the non-stop demand for engaging digital content.
Learning how to animate a logo puts you in a great position to meet this demand, whether it's for your own brand or for clients. If you're new to this whole world, getting a handle on what motion graphics design is (https://creativize.net/blog/what-is-motion-graphics-design) will give you a solid foundation for the principles we're about to cover. This guide will walk you through the practical skills you need to create animations that don't just look cool, but actually work for the brand.
Setting Up Your Logo File for Flawless Animation
Great animation doesn't just happen when you hit the play button. It actually starts with a perfectly prepared file. Trust me, this pre-flight checklist is the most important part of learning how to animate a logo. If you get this wrong, you're signing up for a world of frustration and pixelated headaches.
The foundation of any professional logo animation is a vector file. We're talking formats like Adobe Illustrator (.AI) or Scalable Vector Graphics (.SVG). Unlike pixel-based files like .PNG or .JPG, vectors are built on math. That means you can scale them from a tiny website favicon to a massive billboard with absolutely zero loss in quality. It’s a game-changer.
Why Vectors Are Non-Negotiable
Starting with a raster image like a .PNG is one of the most common mistakes I see, and it instantly kneecaps your project's potential. When you try to blow up a .PNG, the pixels stretch out, leaving you with a blurry, unprofessional mess. Vectors, on the other hand, stay razor-sharp no matter what you throw at them, which is exactly what you need for animated assets that will live on different screens.
This infographic breaks down the essential prep work for your vector file.
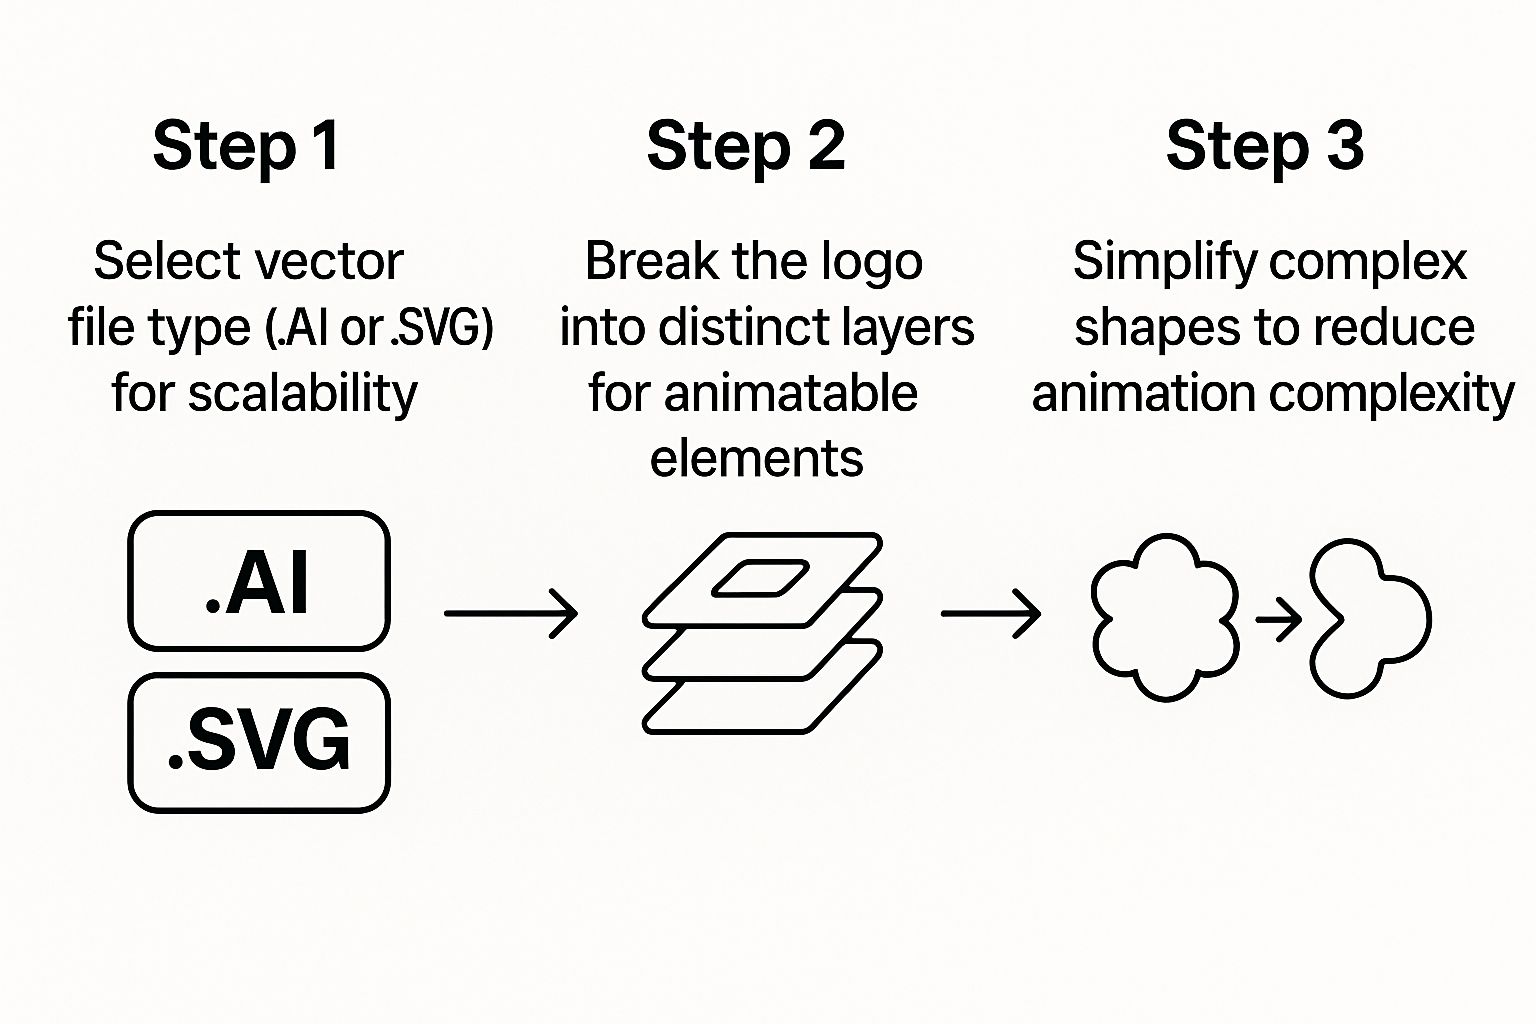
Nailing this process makes sure your logo is scalable, its pieces are ready to move independently, and the whole animation workflow goes a lot smoother.
The real secret to a slick animation is isolating every single moving part. Before you even open your animation software, you have to break your logo down into logical, animatable layers in a program like Adobe Illustrator. If your logo is just one flat object, you can't animate its individual components. It's as simple as that.
Let's say your logo is a rocket ship icon next to your brand name. A proper setup would have separate layers for:
- The body of the rocket
- The flame shooting out the back
- Each letter of the brand name (if you want them to fly in one by one)
The goal is to give yourself total control. By separating elements onto their own layers, you empower yourself to time their appearance, tweak their movement, and create a sophisticated visual story—instead of just having the whole logo pop onto the screen at once.
Simplify for Smoother Motion
Once everything is layered up, take a minute to simplify your shapes. Overly complex paths with thousands of anchor points are a nightmare to work with and can seriously slow down your software. Do yourself a favor and clean up any messy paths or combine shapes that don't need to be separate.
A streamlined vector file isn't just easier to manage; it renders faster, too. This initial cleanup will save you hours of headaches later on.
If you're starting from scratch, our guide on how to create a logo can help you design with animation in mind from day one. By properly prepping your file now, you're setting the stage for a flawless, professional-grade animation.
Finding the Right Logo Animation Software for You
The software you pick is going to make or break your entire experience. Seriously. It dictates not just the final look of your animation but how painful (or fun) the process is to get there. Let's cut through the noise and figure out which tool is the right one for your project.
Ultimately, your choice boils down to a classic balancing act: your creative vision versus your timeline and budget. There's no single "best" software out there—just the best fit for the job at hand.
Adobe After Effects: The Professional Powerhouse
When you absolutely need total creative freedom, Adobe After Effects is the undisputed king. Think of it as the ultimate sandbox for motion design. It lets you meticulously control every single keyframe, tweak every movement, and layer on complex effects until your animation is perfect.
If you’re aiming for a completely bespoke animation that feels unique to a brand, this is your tool. The catch? It comes with a pretty steep learning curve. You won't be an expert overnight, but for anyone serious about motion graphics, the time investment pays off big time.
Template-Based Tools: Quick, Clean, and Accessible
Not every project needs a custom-built masterpiece. Sometimes, you just need a great-looking animation, and you need it now. This is where tools like Canva really shine.
Canva and similar platforms offer libraries of pre-made animation templates. You just drop in your logo, pick a style you like, and you’ve got a finished product in minutes. It's a lifesaver for:
- Rapid Prototyping: Want to see how a few different animation ideas feel? This is the fastest way.
- Social Media Content: Perfect for churning out simple, eye-catching animations for Instagram stories or TikTok posts.
- Total Beginners: It's a great way to dip your toes into logo animation without getting bogged down by technical details.
The trade-off for all that speed and convenience is customization. You're working within the platform's sandbox, which means your animation might look a little familiar. For many small businesses or solo creators, though, that’s a compromise worth making.
LottieFiles: Web-Optimized and Interactive Animations
What if your animation is destined for a website and you're worried about bogging down load times? Say hello to LottieFiles. Lottie is a JSON-based file format that’s an absolute game-changer for web and app animations.
Animations built for Lottie are incredibly lightweight and scalable. They won't slow your site down, they stay perfectly crisp on any screen size, and you can even make them interactive. It's the secret sauce behind many of the slick, smooth animations you see in modern apps.
Choosing the right software can feel overwhelming, but hopefully this breakdown gives you a clearer picture of the landscape. To help you weigh your options, here’s a quick comparison of the top contenders.
Logo Animation Software Comparison
| Software | Best For | Skill Level | Pricing Model |
|---|---|---|---|
| Adobe After Effects | Complete creative control & custom animations | Intermediate to Advanced | Subscription |
| Canva | Fast, template-based social media animations | Beginner | Freemium/Subscription |
| LottieFiles | Lightweight, interactive web & app animations | Intermediate | Freemium/Subscription |
| Apple Motion | Powerful motion graphics on macOS | Intermediate | One-Time Purchase |
| Figma | UI/UX animations & interactive prototypes | Beginner to Intermediate | Freemium/Subscription |
Each of these tools has its place, and the best one really depends on what you're trying to achieve.
For an even deeper dive, our comprehensive animation software comparison breaks down even more options to help you pinpoint the perfect tool for your goals. Taking the time to choose wisely now sets the foundation for your entire project.
Bringing Your Logo to Life with Core Animation Techniques
Okay, you've prepped your logo file and picked your software. Now for the really fun part. This is where we stop talking theory and start breathing some actual personality into your brand.
We're going to focus on a few core animation principles that deliver the biggest impact. The goal here is to turn those static logo elements into a short, engaging story that sticks. It's not just about making things move; it's about making them move with purpose. Every single motion should feel intentional and true to the brand's identity.
This is the real difference between a generic template and a piece of motion design that people actually remember.
Mastering Keyframes The Building Blocks of Motion
Everything in animation starts with keyframes.
Think of them as the start and end points for any action you create. You set a keyframe for an object's initial state (maybe it's off-screen) and another for its final state (centered and visible). The software does the heavy lifting, automatically creating all the frames in between.
This simple concept is what gives you total control. By placing keyframes strategically along your timeline, you dictate the timing and sequence of the entire animation.
For example, you could have your brand's icon pop into view first, followed by the letters of the company name spelling themselves out one by one. That kind of precise control is fundamental to building a narrative, no matter how short.
Easing For Natural and Fluid Movement
If keyframes are the skeleton, then easing is the muscle. It gives your animation character.
Without easing, an object just moves from point A to point B at a constant, robotic speed. It feels jarring and unnatural because nothing in the real world moves like that. Real objects have to speed up and slow down.
Applying easing makes every movement feel smoother and more physical. You can use different types for different effects:
- Ease In: The animation starts slow and then speeds up. This is perfect for objects arriving on screen with a bit of punch.
- Ease Out: The animation starts fast and then slows to a gentle stop. This creates a really soft, controlled landing.
- Ease In & Out: This combo creates the most natural-looking motion. It starts slow, hits its top speed in the middle, and then slows down again for the finish.
Getting the easing right is one of those subtle details that separates amateur work from a truly professional result. It adds a sense of weight and polish, making the animation satisfying to watch instead of just mechanical.
Using Masks for Creative Reveals
Masking is one of the most versatile tricks in a motion designer's toolkit. A mask basically lets you hide or reveal parts of a layer. Simple, right? But it opens up a whole world of creative possibilities for how your logo elements appear.
Instead of just fading your logo in, imagine it's a circle with a checkmark inside. You could use a circular mask that expands from the center, revealing the logo as it grows. The reveal feels much more dynamic and integrated this way.
Another classic example is the "write-on" effect. By animating a mask along the path of a letter, you can make it look like an invisible pen is drawing it on the screen. It's a sophisticated effect that's surprisingly easy to create once you get the hang of how masks work.
Building consistency in these techniques is crucial. Laying out a clear set of rules for how and when to use them can be a huge help, which is something you can explore further in a well-structured animation style guide.
By combining keyframes for timing, easing for fluidity, and masks for creative reveals, you have all the foundational skills you need. These aren't just technical steps; they're the artistic tools for telling your brand's micro-story and making a lasting impression.
Exporting and Using Your Finished Animation
You’ve done the hard work, and your logo animation looks amazing. Now comes the final, crucial step: getting it out of your software and into the world without losing an ounce of quality.
Choosing the right export settings can feel like a chore, but it’s the difference between a crisp, professional asset and a blurry, slow-loading mess. Don’t let a simple settings panel undo all your creative effort.
The format you choose depends entirely on where the animation will live. A file destined for a YouTube intro has completely different needs than one built for a website's hero section. This is especially true now, with motion graphics driving huge engagement—studies show it can boost viewer retention by as much as 80% over static images.
Choosing the Right File Format
Your choices usually boil down to traditional video files versus modern web formats. Each has its place, and knowing when to use which is a core skill for any animator.
Let's break down the most common options:
- .MP4: This is your workhorse format for almost all video content. It gives you a great balance of quality and file size, making it perfect for platforms like YouTube, Instagram, and Facebook.
- .MOV: A favorite among pros, .MOV files can support an alpha channel. That’s a fancy way of saying it can have a transparent background, which is essential if you need to overlay your animated logo on top of other video footage.
- Animated GIF: Tread carefully here. While they’re easy to use, GIFs have a limited color palette and can result in huge files with mediocre quality. They’re best saved for simple email signatures or quick social media replies, not for showcasing your best work.
The most important takeaway is this: for website performance, avoid traditional video formats and GIFs whenever you can. They are often too heavy and will absolutely tank your page load times, which hurts both user experience and your SEO.
Modern Formats for Web Performance
When it comes to websites and apps, the goal is always maximum quality with minimum file size. This is where modern formats completely change the game.
The undisputed champion for web-based logo animations is JSON, the format used by Lottie. A Lottie animation isn't actually a video; it's a tiny file full of code that tells the browser how to redraw your animation in real-time.
This means it's incredibly lightweight, scales perfectly to any screen size without getting pixelated, and can even be made interactive. It’s the gold standard for the web.
Once your logo is ready, exploring various sharing and export options is key to getting it in front of the right people. If you're looking to fit these animations into a bigger picture, our guide on https://creativize.net/blog/video-production-for-small-business offers more context on building a full visual content strategy. By matching your export format to its final destination, you ensure your hard work performs flawlessly everywhere.
Even after you have a solid plan for animating your logo, a few questions always seem to pop up. Let's get those sorted out right now so you can move forward without any second-guessing.
Getting these details straight from the jump can save you a ton of headaches and false starts down the road.
What Should I Budget for Logo Animation?
Honestly, the cost to animate a logo is all over the map. You could do it for free with the built-in tools in something like Canva, which is a fantastic option if you just need something simple based on a template. For a lot of small businesses or passion projects, this is the perfect place to start.
When you're ready for something more unique, hiring a freelance animator is your next move. The price tag here can swing from a few hundred dollars to several thousand, all depending on how complex the animation is and the animator's experience level.
Back in the day, a professional 10-second logo animation involved storyboarding, rendering, and a whole process that could easily cost between $800 and $3,300. These days, AI-powered tools have seriously brought those costs down, making great animation way more achievable. You can see more about how these costs have dropped over at AnimationIconic.com.
What Is the Best File Format to Start With?
This one’s a deal-breaker: you absolutely have to start with a vector file. We're talking Adobe Illustrator (.AI), Scalable Vector Graphics (.SVG), or maybe an .EPS file.
Why is this so important? Vectors are made of mathematical paths, not pixels. That means you can scale your logo up to the size of a billboard and it will never get blurry. More importantly for animation, it lets you pull the logo apart into clean, separate layers—which is the foundation of any professional animation workflow. If you start with a .PNG or .JPG, you're just signing up for a pixelated mess.
How Long Should a Logo Animation Be?
Shorter is almost always better. You want to make a quick, memorable impression, not an epic film.
Here are a couple of good rules of thumb to follow:
- Video Intros & Outros: Keep it between 3 and 7 seconds. That's the sweet spot for grabbing attention at the beginning of a video or signing off with a polished look, all without overstaying your welcome.
- Website & App Use: For things like loading screens or interactive bits on your site, go even shorter. A slick, looping animation of just 1 to 3 seconds feels dynamic and responsive, not distracting.
Keeping it brief makes sure your animation adds to the experience instead of getting in the way of it.
Ready to bring your brand to life with visuals that stick? The professional designers and animators at Creativize can build a logo animation that nails your brand's personality and connects with your audience. Find the perfect creative partner for your project today!